Spyro: Year of the Dragon on the PlayStation has a glitch in Spooky Swamp, where a gem can become impossible to collect and make it impossible to fully complete the game. This is described further in the Spyro Wiki:
Sometimes, in Spooky Swamp, there is a chance that one gem will totally vanish, and Sparx will not be able to track it down after completing Spider Town. If this happens, it will be impossible to get 100%, but one can still access Super Bonus Round with a cheat; however, the Sorceress can’t be fought at all. This is an unusual glitch, and there is no possible way to stop it, or knowing when it is going to happen.
This glitch is caused by killing one of the Mosquitoes for the first time over the water, without having Sparx. This causes the gem to fall into the water and become unretrievable.
Whilst working on a full completion playthrough of the game, my son encountered this glitch. The idea of him having to start the game all over again to get 100% completion felt pretty painful, so I dug into whether there was a way around it. My first thought was that there might be a save file editor that I could use to fix up the save – because we have a MemCard PRO it would have been straightforward to copy the save over to a computer for editing. However, there doesn’t seem to be a level editor available, and I didn’t feel like trying to reverse engineer the save game format.
Instead, I thought another plan would be simpler: open up the save file under emulation in PCSX-Redux, edit the game state to correct the number of gems, and then save the game before copying it back to the MemCard PRO so my son could continue on the real PlayStation. I didn’t see any GameShark / Action Replay codes that would work for the version we seem to be playing, so I figured out some appropriate changes, which are described here for anyone else using the same version.
Edits
The two edits that need to be made are (both 16-bit values):
For 500 gems in Spooky Swamp, set 0x80071B20 to 0x1F4 (500 in hex)
For 4000 gems in total, set 0x8006C7FB to 0xFA0 (4000 in hex)
The gem total value might need to be modified depending on the state of the game at the time – we happened to have 3999 gems, so 4000 would be the appropriate fixed value, but it will likely vary on a different save.
I’m not actually sure the total gem edit is strictly necessary either – it’s needed for the game to stay consistent if play continues after the edit, but I didn’t see evidence of it being stored in a save file – so it may be that the correct total would be recomputed after a save / load cycle anyway.
Version
The edits here have been used with a version of the game that looks like this:
$ sha256sum *

c3081998797fdf3a82829103924445fa823a4431561e0f1c394ee849f08a427f  \
    Spyro - Year of the Dragon (USA) (v1.1).bin
44bff8aecb2cc150553b6e4757420dee97e563effcd3e3b23d841fc664beb7d2  \
    Spyro - Year of the Dragon (USA) (v1.1).cue
I don’t think I’d enable these all the time – I’d probably just have them enabled to fix the glitch then save, and then turn them off again. As above, the 0FA0 value may need changing as appropriate for the value in your save file.
Video
This short video demonstrates the procedure – here I’ve already imported the memory card into PCSX-Redux, loaded up the save and opened the memory editor. I had to use the interpreted CPU to get past the title screen – dynarec seemed to get stuck at the title screen, but I’m using some really old random commit of PCSX-Redux that I built ages ago so it wasn’t too much of a concern.
This post describes my learning and experiments testing kernel patches that implement support for the StarFive JH7110’s display controller.
Many thanks to Michał Wilczyński, whose work the experiments described here built upon (see Acknowledgment).
Background / motivation
(skip this section if you’re just interested in the technical details)
For experimenting with CPython and its JIT on RISC-V, I wanted to use my VisionFive 2. Rather than going with the StarFive distribution of Debian or Ubuntu, I thought it would be generally more convenient to use an upstream distribution for more recent versions of packages – I picked Ubuntu 25.04. In general the distro works pretty well out of the box, except for a couple of limitations noted in the installation instructions:
The on-board GPU is not supported.
PCIe support is incomplete: an NVMe drive can be used, but Wi-Fi cards and external GPUs don’t work.
So, basically no graphics support. That’s fine for building and testing CPython, where I can just SSH into the board and get to work. But it’s a little irksome that there’s no display with an upstream distro for a board that’s been out for over three years. Why is this still the case, and what needs to be done to change this?
I noted from the JH7110 Upstream Status page that most things are upstreamed, but one of the items still “Under Review” is “HDMI / DC8200”, with the last patch series (v5) submitted in 2024. That didn’t look good – looks like no upstream support for the display controller yet.
Ecosystem Note: If you are following the RISC-V space, this IP might sound familiar. The StarFive JH7110 (used in the VisionFive 2) uses the exact same Verisilicon DC8200 display controller.
I am actually working on enabling the display stack for the JH7110 in parallel. While the IP is the same, the integration is vastly different the JH7110 has a complex circular dependency between the HDMI PHY and the clock generator that requires a complete architectural rethink. But that is a story for a future blog post.
This sounds more promising – perhaps there is a route towards upstream support for the display controller, so let’s try out the patches and see how far we can get.
Initial Testing
The RFC patch series on the kernel mailing list is one way to get started, but it depends on a few other unmerged patches. Fortunately Michał uploaded the whole series on top of its dependencies in a branch on Github, so I fetched that branch and built the kernel from it.
After building the kernel, I initially couldn’t get the display controller to work – looking in dmesg suggests an issue:
verisilicon-dc 29400000.display:
    can't deassert reset lines
verisilicon-dc 29400000.display:
    probe with driver verisilicon-dc failed with
    error -110
starfive-inno-hdmi-controller 29590000.hdmi:controller:
    probe with driver starfive-inno-hdmi-controller
    failed with error -110
Originally I started to suspect there was something wrong with my board, but booting up with the StarFive kernel from the Debian distribution showed that the display controller was working, and I could see the login screen, so there must be some issue with the kernel I was booting instead.
The error -110 seems to be a timeout, so it could be that the clocks weren’t enabled for the resets that weren’t getting deasserted. Looking at the source in vs_dc.c, the code was trying to deassert three resets, core, axi, and ahb:
// From vs_dc_probe() in
// driver/gpu/drm/verisilicon/vs_dc.c:

dc->rsts[0].id = "core";
dc->rsts[1].id = "axi";
dc->rsts[2].id = "ahb";

// ...

ret = reset_control_bulk_deassert(
        VSDC_RESET_COUNT, dc->rsts);
if (ret) {
    dev_err(dev, "can't deassert reset lines\n");
    return ret;
}
So the question is – are all of the resets failing to be deasserted, or just one or two? To find out, I modified the the vs_dc_probe() function to deassert each reset individually, and which showed that they all timed out.
So it seems that the clocks are not enabled for any of them. I’m still a little fuzzy as to why they were not enabled, but some investigation showed that the devicetree has some reference to them in jh7110.dtsi:
In the above excerpt, I’ve not been able to understand the relationship between the clocks and resets in voutcrg and dc8200 or whether anything ought to change. As a “brute-force” workaround, let’s just try enabling them in clk-starfive-jh7110-vout.c by adding them at the end of jh7110_voutcrg_probe(), with the aim of ensuring that if the probe completes successfully, the clocks will be enabled:
// In jh7110_voutcrg_probe():

ret = clk_bulk_prepare_enable(
          top->top_clks_num,
          top->top_clks);

if (ret)
    goto err_exit;
After this change, we then get in dmesg:
verisilicon-dc 29400000.display:
    DC8200 rev 5720 customer 30e
starfive-inno-hdmi-controller 29590000.hdmi:controller:
    Using MFD regmap for registers
i2c i2c-7: of_i2c:
    modalias failure on /soc/display-subsystem@29400000/hdmi@29590000/controller/ports
i2c i2c-7:
    Failed to create I2C device for /soc/display-subsystem@29400000/hdmi@29590000/controller/ports
starfive-inno-hdmi-controller 29590000.hdmi:controller:
    [drm:inno_hdmi_probe] registered Inno HDMI I2C bus driver
verisilicon-dc 29400000.display:
    DC8200 rev 5720 customer 30e
verisilicon-dc 29400000.display:
    Skipping output 1
[drm] Initialized verisilicon 1.0.0 for 29400000.display on minor 0
This looks much more promising! Next, let’s see what modetest can tell us:
root@visionfive2:/home/gmarkall# modetest -p
trying to open device '/dev/dri/card0'... done
opened device `Verisilicon DC-series display
               controller driver`
    on driver `verisilicon` (version 1.0.0 at 0)
CRTCs:
id	fb	pos	size
35	0	(0,0)	(0x0)
  #0  nan 0 0 0 0 0 0 0 0 0 flags: ; type:
  props:
	24 VRR_ENABLED:
		flags: range
		values: 0 1
		value: 0
41	0	(0,0)	(0x0)
  #0  nan 0 0 0 0 0 0 0 0 0 flags: ; type:
  props:
	24 VRR_ENABLED:
		flags: range
		values: 0 1
		value: 0

Planes:
id crtc fb CRTC x,y x,y  gamma size possible crtcs
33	0	0	0,0		0,0	0       	0x00000001
  formats: XR12 XB12 RX12 ...
root@visionfive2:/home/gmarkall# modetest -s \
  37@35:1920x1080 -P 33@35:1920x1080
trying to open device '/dev/dri/card0'... done
opened device
    `Verisilicon DC-series display controller driver`
  on driver `verisilicon` (version 1.0.0 at 0)
setting mode 1920x1080-60.00Hz
  on connectors 37, crtc 35
testing 1920x1080@XR24 overlay plane 33
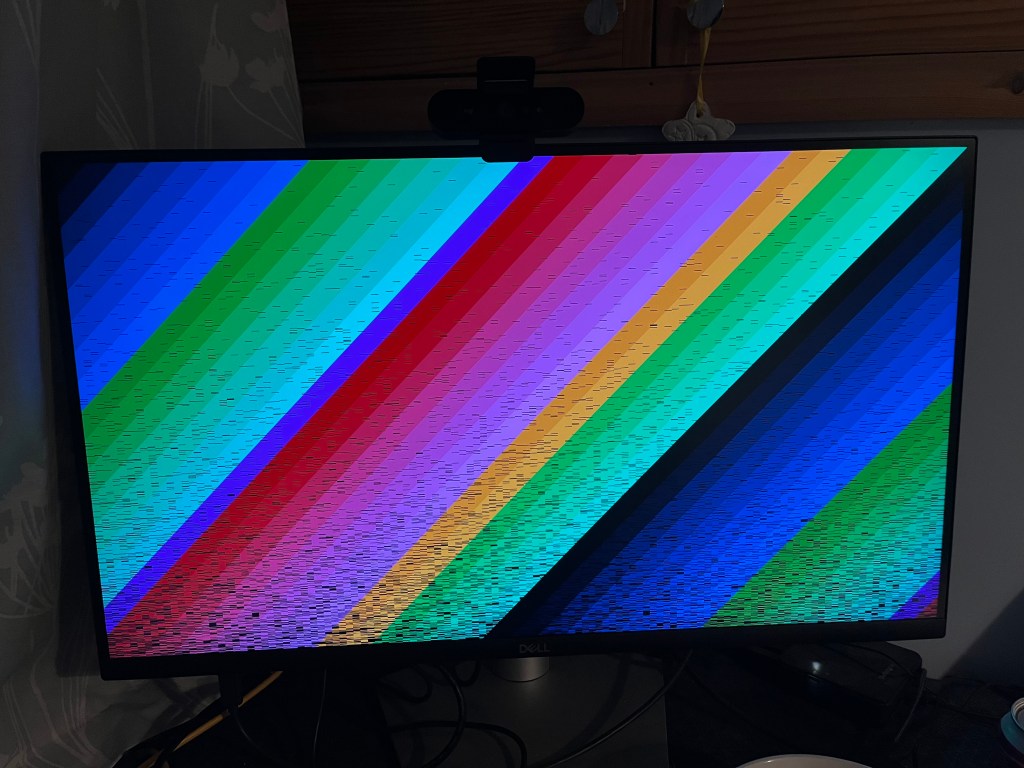
We get an image that almost looks perfect:
The only apparent issue is the black lines, about which we can note a couple of things:
The “earliest” pixels in the image are nearly all correct
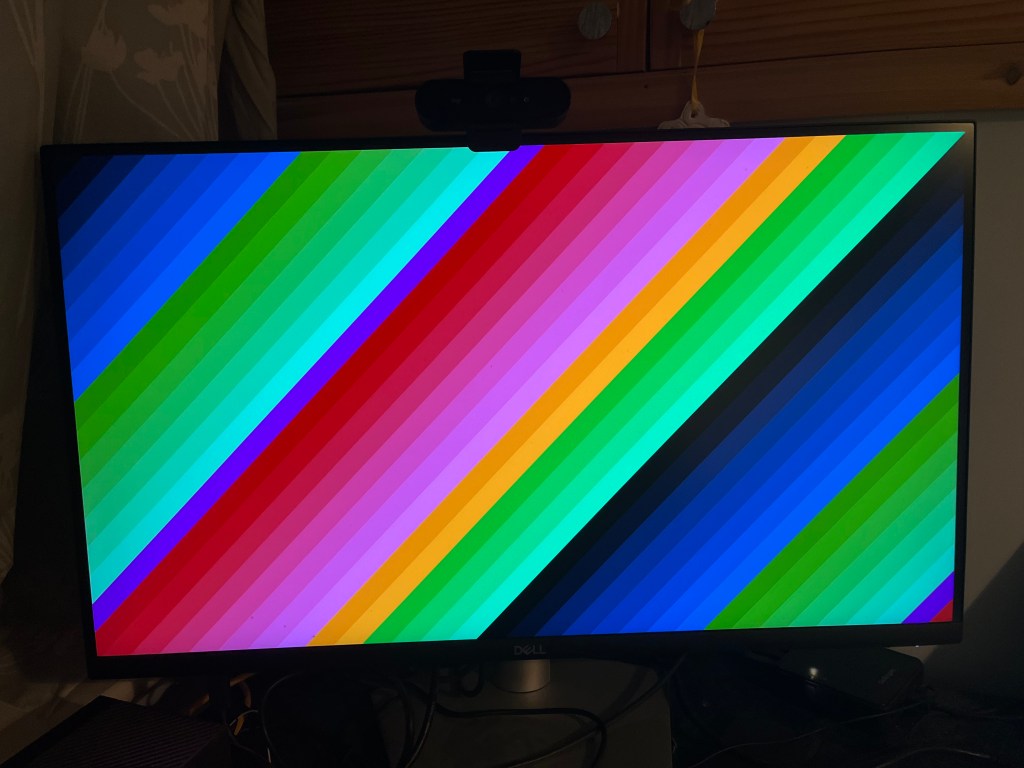
Using the machine (running terminal commands, htop, listing dirs, etc.) causes the black lines to fill in, until eventually the image is perfect:
Both these items suggest that there is some cache coherence issue – pixels are written to the buffer but are cached and not flushed to RAM where the display controller can see them until all the cache lines are evicted. This requires some further investigation.
Next steps
After some email discussion, Michał confirmed that there is a caching issue. It seems that this issue is a little separate from enabling the display controller itself. I’ve been spending some time investigating this avenue (and made a little progress), but will need to save the details for a future post.
Acknowledgment
Many thanks to Michał Wilczyński for the various ways in which he has shared his efforts and extensive expertise:
Developing and posting the patch series enabling the JH7110 display controller,
Writing up the blog post on the TH-1520 GPU that initially piqued my interest,
For kindly taking the time to correspond with me and patiently give me some pointers in the right directions when I was getting started with testing out the patches.
I’m starting to learn a bit about Linux GPU driver development. This post collects together a few resources I’ve found useful; I hope it might provide a starting point for someone else following a similar path.
Linux GPU Driver Developers’ Guide: The Linux kernel documentation itself seems pretty comprehensive and detailed. There are a couple of gaps (“[Insert diagram of typical DRM stack here]”, for example 😊) but otherwise it seems to be easy to read through to get an overview of all the abstractions commonly used. I’m still working through reading it all.
It also provides this handy TODO List, where the “starter”-level tasks look approachable for someone new to the subsystem looking to familiarise themselves with some practical experience.
The Zephyr Project’s guide to Devicetree: I realised pretty quickly that for working on drivers for embedded devices, it was going to be necessary to understand Devicetree, which I’ve never looked at before. The guide from the Zephyr project provided a convenient tutorial introduction. I’m not yet an expert on all the details, but I know enough to make a start and understand the semantics of DTS files – enough to be dangerous, perhaps.
Navigating the Linux Graphics Stack: A talk at the Embedded Linux Conference 2022 given by Michael Tretter of Pengutronix (abstract). Watching this talk really helped to build the “block diagram” of graphics driver abstractions in the kernel, and how they fit together. The latter part of the talk also covers the userspace – Wayland, Mesa, EGL, etc., which builds up a complete picture of the Linux graphics stack.
The Linux Graphics Stack in a Nutshell: A talk at the SUSE Labs Conference 2023 given by Thomas Zimmermann of SUSE. I’ve yet to watch this, but I’ve got it on my list because a quick skim of the slides suggests it fills in a lot of background motivating why things are the way they are in the current stack. It also breaks down each layer of the stack in detail, explaining what each component does.
Further reading?
I’ll expand the list with other resources as I find them. What else should I be reading? Please do let me know of other good resources to add to my reading list.
I’ve recently been building kernels for the VisionFive 2. I started out by using the native toolchain on the device, and got through a few development iterations that way, but it was painfully slow.
I had been reluctant to set up a cross compilation toolchain for kernel development, because I thought it might be fiddly and hard work; I’m quite familiar with building a cross-compilation toolchain for targeting bare-metal RISC-V targets, but I’ve never built one for Linux, and I expected there to be some new challenges I’d have to solve to do that – it turns out there is a relatively simple path to get a working cross-compilation workflow.
This post outlines the setup and use of the workflow I’ve settled on.
Crosstool-ng
My initial attempt was similar to my bare-metal toolchain build process:
Install kernel headers somewhere,
Build Binutils,
Build a Stage 1 GCC,
Build the C library (glibc),
Build Stage 2 GCC.
The only real difference was the kernel header installation and the use of glibc instead of newlib, so I thought it shouldn’t be too much hassle. However, after a couple of mis-steps that appeared as though they could either be minor, or have knock-on effects later on in the toolchain build or use (it wasn’t clear which) and an ever-growing set of local scripts to perform the build, I capitulated and accepted there must be a better way.
Crosstool-ng can be used to build cross toolchains for many different targets, and it turned out to be apt for my purposes for a RISC-V Linux target.
Building the toolchain
Crosstool-ng includes sample configurations for many different targets (aarch64-rpi4-linux-gnu, mips-unknown-elf, and many others…) and it also includes one for RISC-V Linux: riscv-unknown-linux-gnu. So configuration of the toolchain build was as simple as:
ct-ng riscv64-unknown-linux-gnu
At this point it’s also possible to customise the configuration with:
ct-ng menuconfig
to adjust many aspects of the toolchain (install location, default architecture / ABI, etc.). I found the defaults were OK and didn’t need to change anything – I did configure the ABI as lp64d but I think this might have been the default anyway.
Following configuration, I could build the toolchain with:
ct-ng build
The build takes a few minutes to complete. Afterwards, I put the toolchain on the path with:
export PATH=${TOOLCHAIN_PATH}/bin:${PATH}
Here, TOOLCHAIN_PATH is assumed to be the path to the root of the installation – by default this is ~/x-tools.
At this point, we’re ready to build kernels.
Building kernels
As I went from a native build to a cross-build, I already had a config to use. I pulled this from the device and copied it to the kernel tree:
cd <linux kernel tree>
cp ~/vf2-config .config
Then updated the config for the current setup:
make ARCH=riscv \
     CROSS_COMPILE=riscv64-unknown-linux-gnu- \
     olddefconfig
The kernel, modules and DTBs can then be built with:
make ARCH=riscv \
     CROSS_COMPILE=riscv64-unknown-linux-gnu- \
     Image modules dtbs
I don’t have any modules in the config, so I omit modules, but left it in here for completeness.
Installation / setup on the device
I copied over the image (Image) and DTB (jh7110-starfive-visionfive-2-v1.2a.dtb for my board, yours may differ) onto the VisionFive 2. Following that, we need to:
Install the image in /boot,
Install the DTB in a location where flash-kernel will find it,
Create an initrd, and
Update GRUB.
Installing the image is a straightforward copy:
cp ~/Image /boot/vmlinux-6.17.0-rc6-cross
I’m running Ubuntu 25.04 on the VisionFive 2, and in that setup, the DTB needs copying to a location where flash-kernel finds it, as this is run when update-initramfs is run – I’m not sure if this next step is common across all distros, or a peculiarity of my distro choice. One location it will look is /lib/firmware/<kernel-version>/device-tree, so let’s copy it there:
Before rebooting, I checked that grub.cfg looked as expected. The relevant parts contained (slightly abridged):
echo    'Loading Linux 6.17.0-rc6-cross ...'
linux   /vmlinuz-6.17.0-rc6-cross \ ...
echo    'Loading initial ramdisk ...'
initrd  /initrd.img-6.17.0-rc6-cross
echo    'Loading device tree blob...'
devicetree      /dtb-6.17.0-rc6-cross
After rebooting, we see the following in dmesg (edited for blog formatting):
Booting Linux on hartid 4
Linux version 6.17.0-rc6-gf93b6ff79cc8-dirty
    (gmarkall@housel)
    (riscv64-unknown-linux-gnu-gcc
        (crosstool-NG 1.28.0.6_620b909) 15.2.0,
     GNU ld
        (crosstool-NG 1.28.0.6_620b909) 2.45) #3 SMP
    Fri Jan 23 22:41:46 GMT 2026
Machine model: StarFive VisionFive 2 v1.2A
As expected (or hoped!) – the cross-compilation toolchain built earlier was used to compile the kernel.
Iteration
For successive kernel builds, we don’t need to perform all of the above steps. In general, only the kernel needs updating, which can be done after the Image is built and copied to the device:
cp ~/Image /boot/vmlinux-6.17.0-rc6-cross
If the devicetree changed, then it also needs to be copied, but instead of copying to the location referenced by flash-kernel, we can write over the location GRUB loads it from directly:
Note: this differs from the location given in grub.cfg above, because the GRUB config references a symlink that points to the actual location written to by the cp command.
Future improvements
The above process is a lot faster and more streamlined than what I was doing originally, but it could still be a little faster. Kexec is a mechanism for a new Linux kernel to be booted from an already-running one. Using it would save having to copy the new kernel into /boot and then reboot.
A nice guide to it (that I intend to try and follow) is given in Rahul Rameshbabu’s blog post on kexec. If / once I get that working, I’ll update this post (or post a follow-up) outlining the process and any other considerations specific to this VisionFive 2 setup.
Whilst working on ORCJITv2 support for llvmlite and testing on RISC-V, I noticed that JIT works on RISC-V in LLVM 15 out of the box, but it didn’t seem to work on LLVM 14 at all. For example, even the HowToUseLLJIT example fails:
$ ./bin/HowToUseLLJIT
Unsupported CPU type!
UNREACHABLE executed at
  llvm/lib/ExecutionEngine/RuntimeDyld/RuntimeDyldELF.cpp
    :1069!
PLEASE submit a bug report to <url>
and include the crash backtrace.

Stack dump:
0.      Program arguments: ./bin/HowToUseLLJIT
#0 0x0000002ace21364e PrintStackTraceSignalHandler(void*)
                      Signals.cpp:0:0
Aborted
I assumed that perhaps some of the pieces necessary for JIT on RISC-V made it into LLVM 14, but not enough for complete operation. Whilst researching ORCJITv2 I came across a Mesa llvmpipe MR that adds support for ORCJITv2 and RISC-V. In amongst the discussion are some comments suggesting that it was being tested and appeared to work on RISC-V with LLVM 14 (the latest version at the time). How could this be?
One possible option I came across in the LLVM Phabricator was a diff adding minimal RISC-V support to RuntimeDyld – this seems to make sense because the issue in the trace above comes from RuntimeDyld. However, the diff wasn’t merged.
There are two JIT linkers in LLVM – RuntimeDyld (used as a component with MCJIT) and JITLink (used with ORC’s ObjectLinkingLayer). It even looked like support for RISC-V had been added to JITLink in this commit from 2021. So in the HowToUseLLJIT example above, why are we seeing errors from RuntimeDyld?
Well, it looks like success. Using JITLink on RISC-V in LLVM 14 covers this simple “Hello World”-type use case, but falls apart for more complex operations – I tried running the llvmlite test suite and got:
So it “works” but doesn’t support all of the necessary relocations. Between LLVM 14 and 15 there were a few patches towards correcting and increasing support for RISC-V relocations:
If we further apply these on our LLVM 14 branch and rebuild, then when re-testing llvmlite we now get:
$ python -m unittest \
    llvmlite.tests.test_binding.TestOrcLLJIT
........JIT session error: Symbols not found:
                           [ Py_GetVersion ]
...EE.....
=====================================================
ERROR: test_object_cache_getbuffer
       (llvmlite.tests.test_binding.TestOrcLLJIT)
------------------------------------------------------
Traceback (most recent call last):
  File "llvmlite/tests/test_binding.py",
        line 1265, in test_object_cache_getbuffer
    lljit.set_object_cache(notify, getbuffer)
  File "llvmlite/binding/orcjit.py",
        line 86, in set_object_cache
    ffi.lib.LLVMPY_SetObjectCache(self, self._object_cache)
  File "llvmlite/binding/ffi.py", line 153,
        in __call__
    return self._cfn(*args, **kwargs)
ctypes.ArgumentError: argument 1: <class 'TypeError'>:
    expected LP_LLVMExecutionEngine instance instead of
    LP_LLVMOrcLLJITRef

======================================================
ERROR: test_object_cache_notify
       (llvmlite.tests.test_binding.TestOrcLLJIT)
------------------------------------------------------
Traceback (most recent call last):
  File "llvmlite/tests/test_binding.py",
        line 1234, in test_object_cache_notify
    lljit.set_object_cache(notify)
  File "llvmlite/binding/orcjit.py",
        line 86, in set_object_cache
    ffi.lib.LLVMPY_SetObjectCache(self, self._object_cache)
  File "llvmlite/binding/ffi.py",
        line 153, in __call__
    return self._cfn(*args, **kwargs)
ctypes.ArgumentError: argument 1: <class 'TypeError'>:
    expected LP_LLVMExecutionEngine instance instead of
    LP_LLVMOrcLLJITRef

------------------------------------------------------
Ran 18 tests in 1.160s

FAILED (errors=2)
Everything bar a couple of items is working – the error messages we see are due to llvmlite:
Support for the object cache is not yet implemented – it can be seen from the the traceback that I’m passing LLJIT objects into functions that are expecting MCJIT ExecutionEngines.
The JIT Session Error mentioning a missing Py_GetVersion symbol is emitted during a test of an error condition – it’s expected that linking to Py_GetVersion should fail in that test, but I haven’t understood how to suppress the emission of that error message.
If you want to use JIT on RISC-V in LLVM 14, you can grab my branch with all the fixes above applied:
It is quite fast (relative to my previous toolchain work done under qemu) – I could build LLVM in under 4 hours.
It seems rock-solid – I have kept all 4 cores at 100% for hours on end, with no apparent issues. Running the GCC testsuite identified no issues.
Overall I’m really impressed with the board and I think it’s a great platform for RISC-V toolchain development.
This post outlines:
What I did to build the toolchains, and
Some measurements and observations.
LLVM
I built LLVM first because I’m actually going to need to use it to work on Numba. I used the LLVM 15.0.6 sources (the latest release version at the time of writing). First I installed dependencies:
(or something like that) but I couldn’t easily work out how to add a deb-src line to the APT sources that actually worked, so I derived that list of packages by looking at the source package instead. Following dependency installation, I configured for RISC-V only (because I am mainly interested in working on JIT compilation) a release build with assertions – I wasn’t sure if I had enough disk space for a debug build, and release with assertions is a reasonable compromise:
I had to use 3 cores because 8GB RAM is not enough to link without running out of RAM when buiding with 4 cores. I was using ld from binutils, and I wonder if using an alternative linker would be more efficient – I need to check whether gold, mold, or lld support RISC-V first.
The build was pretty fast:
real	230m55.985s
user	671m8.705s
sys	    20m51.997s
The build completed in just under 4 hours, which for an SBC is pretty good – it’s quick enough for it not to be a complete pain to build toolchains. Compared to an emulated system I was using before where I had to wait all day even though I was emulating 8 cores on a Xeon Gold 6128, it’s blazing fast!
Since I built LLVM I’ve been using it for llvmlite development without issues. llvmlite is primarily for compiling and JITting code – LLVM JIT works “out of the box” in LLVM on RISC-V (HowToUseLLJIT is an example program included with the LLVM source distribution that demonstrates how to use the ORCv2 LLJIT class):
Next I tried building GCC 12.2 – this was mainly a curiosity for me because I don’t have a real use for it right now (other than the generally good “principle” of using up-to-date software), but I’ve spent a lot of time working on GCC-based toolchains, particularly for RISC-V, so it seemed interesting. I installed a few dependencies – possibly not all of these are required, but I was pretty certain this would cover everything needed:
mkdir build-gcc-12.2.0
cd build-gcc-12.2.0
../gcc/configure \
  --enable-languages=c,c++,fortran \
  --prefix=/data/gmarkall/opt/gcc/12.2.0 \
  --disable-multilib \
  --with-arch=rv64gc \
  --with-abi=lp64d
make -j4
There’s one problem building GCC with the Debian image on the VisionFive 2, which is that the GCC RISC-V target seems not to be correctly set up for Debian multiarch – building will eventually fail with a message like:
/usr/include/stdio.h:27:10: fatal error:
  bits/libc-header-start.h: No such file or directory
  27 | #include <bits/libc-header-start.h>
     |          ^~~~~~~~~~~~~~~~~~~~~~~~~~
as it fails to find headers because it’s looking in the wrong location – /usr/include instead of the architecture-specific /usr/include/riscv64-linux-gnu.
The stage 1 xgcc doesn’t seem to know about multiarch:
$ ./gcc/xgcc -print-multiarch
# (no output)
A small patch works around this:
diff --git a/gcc/config/riscv/t-linux b/gcc/config/riscv/t-linux
index 216d2776a18..f714026b3cc 100644
--- a/gcc/config/riscv/t-linux
+++ b/gcc/config/riscv/t-linux
@@ -1,3 +1,4 @@
 # Only XLEN and ABI affect Linux multilib dir names, e.g. /lib32/ilp32d/
 MULTILIB_DIRNAMES := $(patsubst rv32%,lib32,$(patsubst rv64%,lib64,$(MULTILIB_DIRNAMES)))
 MULTILIB_OSDIRNAMES := $(patsubst lib%,../lib%,$(MULTILIB_DIRNAMES))
+MULTIARCH_DIRNAME = $(call if_multiarch,riscv64-linux-gnu)
Running the build again after making this change succeeds. Also, xgcc now knows about multiarch:
$ ./gcc/xgcc -print-multiarch
riscv64-linux-gnu
I think I need to report this and maybe submit a proper patch upstream – the above patch is good enough to work around the issue for building now, but isn’t a general solution – for example, it’s guaranteed not to work on a riscv32 system!
The build takes a bit longer than LLVM:
real 331m22.192s
user 1192m59.381s
sys 24m57.932s
At first I was surprised that it took longer than LLVM, but it has the bootstrapping process to go through, which goes some way towards increasing the build time.
I also ran the GCC test suite:
make check -j 4
Which takes a little while, but is worth the wait:
real    245m35.888s
user    773m59.513s
sys     133m17.827s
The results are not 100% passing, but look pretty good:
		=== gcc Summary ===

# of expected passes		138016
# of unexpected failures	461
# of unexpected successes	4
# of expected failures		1035
# of unresolved testcases	48
# of unsupported tests		2888

		=== g++ Summary ===

# of expected passes		221581
# of unexpected failures	544
# of unexpected successes	4
# of expected failures		1929
# of unresolved testcases	40
# of unsupported tests		10418

        === gfortran Summary ===

# of expected passes		65099
# of unexpected failures	13
# of expected failures		262
# of unsupported tests		165
None of the problems look like any kind of real issue – many asan tests failed, which I guess might be due to lack of support (or it not having been enabled correctly by default) and many other issues are checks that scan the output for particular patterns (which can be fragile) or tests for excess error messages / warnings. I’d have to look in depth to be certain, but I have high confidence that all is well here.
Conclusion
Building GCC and LLVM on the VisionFive 2 was relatively pain-free, especially for a very new SBC with a relatively new software ecosystem. If you’re into RISC-V toolchain development and want to work on a native system (as opposed to e.g. using qemu under linux, or targeting very small embedded systems that need cross compilation anyway), it’s a great choice!
I’m expecting to have a productive time working on Numba and llvmlite for RISC-V with this board.
StarFive’s VisionFive 2 is a quad-core riscv64 board with up to 8GB of RAM. I bought one to work one RISC-V support in Numba. There’s some choices to make when buying the board and accessories – this post describes my setup and the rationale behind my decisions. I’ve also provided costings and links to purchase at the end, to aid anyone wanting a similar setup (especially in the UK).
Board: Super Early Bird (Rev 1.2A) with 8GB of RAM and WiFi
The VisionFive 2 comes in 2GB, 4GB, and 8GB variants. I picked 8GB because compiling and linking LLVM, which is used by Numba, is quite memory-intensive. Mine is a Super Early Bird version, which has one 10/100Mbit eithernet port and one gigabit ethernet port. Later versions will have two gigabit ports, but I don’t need two gigabit ports, and I didn’t want to wait longer to start working with the board.
There is also an option to include a supported WiFi adapter (based on the ESWIN 6600U) – I took this as it only adds a small amount to the price and it could come in handy in future. I’m not using it right now because it seems to not work out of the box with the StarFive Debian build, and it’s not essential for me.
Nothing special about this – it was a cheap NVMe SSD with decent capacity. It works fine in the VF2. I also tried a Samsung SSD 980 temporarily (to make sure the M.2 slot worked before I ordered the Kioxia) that I borrowed from my Jetson AGX Xavier.
I had previously tried an old Intel SSD with a SATA interface, which did not work – as another user mentioned on the forum, the B/M keyed SATA SSD drives are not compatible.
It doesn’t seem to be easy to locate a compatible heatsink and fan, but I noticed from a mechanical drawing of the ODroid XU4 that it should use a heatsink with the same dimensions and hole distance. I ordered from the ODroid UK store. This ended up being quite pricey, but had the advantage of actually being obtainable in the UK within a couple of days.
One difference between the XU4 and the VF2 is the size of the fan connector – it is much larger on the VF2.
ODroid XU4 fan alongside connector compatible with the VisionFive 2
I had a spare connector of the correct size handy, so I was able to replace it. After unscrewing the fan and peeling back the sticker, the solder points for the cable are visible:
Fan with solder points exposed
Then the heatsink can be fitted to the board. I applied thermal paste and pushed the pins through. I did this with the SSD removed, because one of the through-holes is beneath the SSD, and the pin suddenly pushing through could hit it a bit hard.
Heatsink fitted to VisionFive 2
Finally I added the fan back and plugged it in:
Power supply: Lenovo 65W USB-C
I didn’t have a PSU ready when I got the board so I borrowed the one from my laptop. It’s been rock-solid even under heavy load with this PSU, so rather than taking a risk with some other power supply or Pi supply, I decided to just order another of the same model from the Lenovo UK store.
I note that the VF2 Data Sheet (Section 4.1) states that at least 9V / 2A is required, which further made me nervous about using a regular Pi supply. However, the Quick Start Guide (Section 1.2) says it will take “5V up to 30W (minimum 3A)” – I’m not quite sure how to interpret that though!
Costings / purchase links
None of the links are affiliate links – they are simply provided for convenience
Although this seems a bit pricey, I could quickly have spent hours searching and days waiting for something else, which wouldn’t be worth the saving in the end.
Total: £204.31 – Not bad for a RISC-V SBC with this much power and potential, in my opinion.
Continuing…
I’ve been using this setup for building GCC and LLVM toolchains. I hope to write about that in a future post, but in the meantime I’m posting progress updates and other notes on my Mastodon account: https://mastodon.social/@gmarkall
Background thinking around this question: There are instances of OSS users levelling expectations at OSS maintainers that they provide a certain level of service, whilst OSS maintainers generally have no obligations to users. Jacob Tomlinson provides a good summary and discussion of this issue in “Don’t be that open-source user, don’t be me”.
Existing terms: The term voluntary is often used to describe OSS contributions, and contributors referred to as volunteers. In particular, these terms are sometimes used to remind users that maintainers aren’t generally obligated to do anything in particular. However, I find that these terms don’t always accurately convey the nature of contributions, particularly when contributors are employed to work on them – the idea of a volunteer can carry the connotation that any contributions are made in free time, or that no reward is being received for them.
An alternative: Discretionary contributions are those that are left to the maintainer’s choice or judgment – there may be remuneration for their work, but in terms of the relationship between the user and the maintainer, there is no particular obligation. In these cases, is discretionary contribution a more appropriate term than voluntary contribution?