
StarFive’s VisionFive 2 is a quad-core riscv64 board with up to 8GB of RAM. I bought one to work one RISC-V support in Numba. There’s some choices to make when buying the board and accessories – this post describes my setup and the rationale behind my decisions. I’ve also provided costings and links to purchase at the end, to aid anyone wanting a similar setup (especially in the UK).
Board: Super Early Bird (Rev 1.2A) with 8GB of RAM and WiFi
The VisionFive 2 comes in 2GB, 4GB, and 8GB variants. I picked 8GB because compiling and linking LLVM, which is used by Numba, is quite memory-intensive. Mine is a Super Early Bird version, which has one 10/100Mbit eithernet port and one gigabit ethernet port. Later versions will have two gigabit ports, but I don’t need two gigabit ports, and I didn’t want to wait longer to start working with the board.
There is also an option to include a supported WiFi adapter (based on the ESWIN 6600U) – I took this as it only adds a small amount to the price and it could come in handy in future. I’m not using it right now because it seems to not work out of the box with the StarFive Debian build, and it’s not essential for me.
I ordered from the WayPonDEV store on Amazon on December 16th, and it arrived on the 29th!
NVMe SSD: Kioxia Exceria 500GB
Nothing special about this – it was a cheap NVMe SSD with decent capacity. It works fine in the VF2. I also tried a Samsung SSD 980 temporarily (to make sure the M.2 slot worked before I ordered the Kioxia) that I borrowed from my Jetson AGX Xavier.
I had previously tried an old Intel SSD with a SATA interface, which did not work – as another user mentioned on the forum, the B/M keyed SATA SSD drives are not compatible.
I ordered the drive from Scan UK.
Heatsink and fan: ODroid XU4 heatsink / fan
It doesn’t seem to be easy to locate a compatible heatsink and fan, but I noticed from a mechanical drawing of the ODroid XU4 that it should use a heatsink with the same dimensions and hole distance. I ordered from the ODroid UK store. This ended up being quite pricey, but had the advantage of actually being obtainable in the UK within a couple of days.
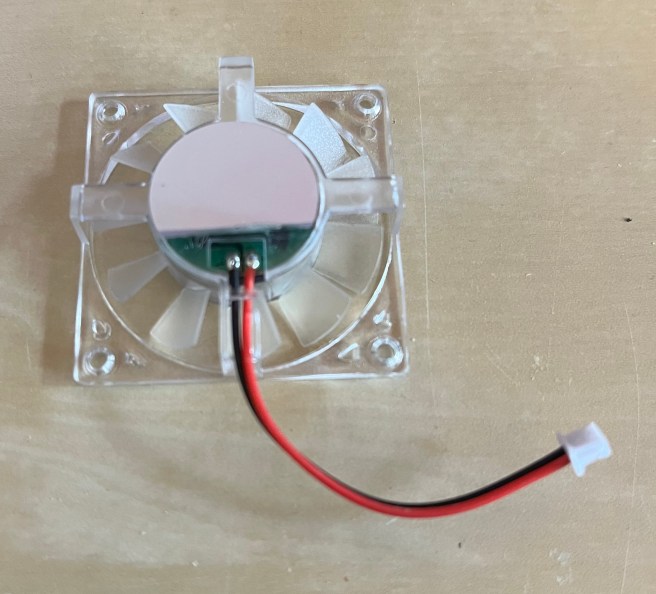
One difference between the XU4 and the VF2 is the size of the fan connector – it is much larger on the VF2.

I had a spare connector of the correct size handy, so I was able to replace it. After unscrewing the fan and peeling back the sticker, the solder points for the cable are visible:
Then the heatsink can be fitted to the board. I applied thermal paste and pushed the pins through. I did this with the SSD removed, because one of the through-holes is beneath the SSD, and the pin suddenly pushing through could hit it a bit hard.
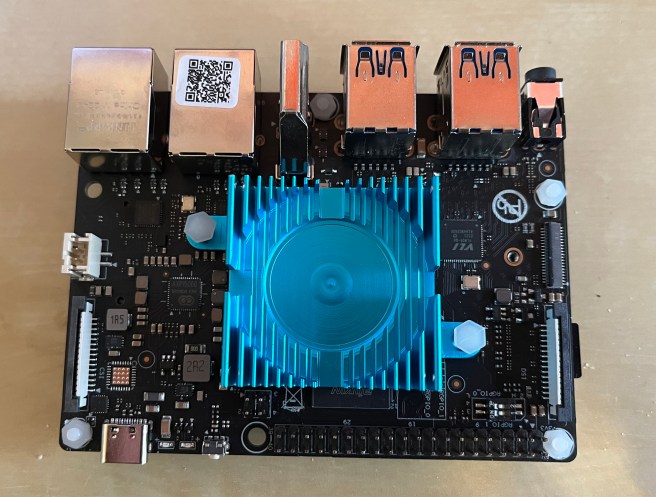
Finally I added the fan back and plugged it in:

Power supply: Lenovo 65W USB-C
I didn’t have a PSU ready when I got the board so I borrowed the one from my laptop. It’s been rock-solid even under heavy load with this PSU, so rather than taking a risk with some other power supply or Pi supply, I decided to just order another of the same model from the Lenovo UK store.
I note that the VF2 Data Sheet (Section 4.1) states that at least 9V / 2A is required, which further made me nervous about using a regular Pi supply. However, the Quick Start Guide (Section 1.2) says it will take “5V up to 30W (minimum 3A)” – I’m not quite sure how to interpret that though!
Costings / purchase links
None of the links are affiliate links – they are simply provided for convenience
- VisionFive 2 Super Early Bird 8GB with WiFi:
- $143.97 with shipping and taxes, came to £117.86
- Item link: https://www.amazon.com/dp/B0BGM1KQXQ?psc=1&ref=ppx_yo2ov_dt_b_product_details
- SSD:
- £34.47 including shipping
- Item link: https://www.scan.co.uk/products/500gb-kioxia-exceria-m2-2280-pcie-30-x4-nvme-ssd-1700mb-s-read-1600mb-s-write-350k-400k-iops
- Heatsink and fan:
- £29.24 after shipping and low order fee added
- Although this seems a bit pricey, I could quickly have spent hours searching and days waiting for something else, which wouldn’t be worth the saving in the end.
- Item link: https://www.odroid.co.uk/odroid-accessories/odroid-cooling/odroid-xu4-blue-fan
- Power supply:
- £22.74 including delivery
- Item link: https://www.lenovo.com/gb/en/p/accessories-and-software/chargers-and-batteries/chargers/4x20m26276
Total: £204.31 – Not bad for a RISC-V SBC with this much power and potential, in my opinion.
Continuing…
I’ve been using this setup for building GCC and LLVM toolchains. I hope to write about that in a future post, but in the meantime I’m posting progress updates and other notes on my Mastodon account: https://mastodon.social/@gmarkall
