
This post describes my learning and experiments testing kernel patches that implement support for the StarFive JH7110’s display controller.
Many thanks to Michał Wilczyński, whose work the experiments described here built upon (see Acknowledgment).
Background / motivation
(skip this section if you’re just interested in the technical details)
For experimenting with CPython and its JIT on RISC-V, I wanted to use my VisionFive 2. Rather than going with the StarFive distribution of Debian or Ubuntu, I thought it would be generally more convenient to use an upstream distribution for more recent versions of packages – I picked Ubuntu 25.04. In general the distro works pretty well out of the box, except for a couple of limitations noted in the installation instructions:
- The on-board GPU is not supported.
- PCIe support is incomplete: an NVMe drive can be used, but Wi-Fi cards and external GPUs don’t work.
So, basically no graphics support. That’s fine for building and testing CPython, where I can just SSH into the board and get to work. But it’s a little irksome that there’s no display with an upstream distro for a board that’s been out for over three years. Why is this still the case, and what needs to be done to change this?
I noted from the JH7110 Upstream Status page that most things are upstreamed, but one of the items still “Under Review” is “HDMI / DC8200”, with the last patch series (v5) submitted in 2024. That didn’t look good – looks like no upstream support for the display controller yet.
Unrelatedly, I came across Michał Wilczyński’s blog post on enabling the PowerVR GPU on the T-Head TH-1520. Inside that post is an interesting note:
Ecosystem Note: If you are following the RISC-V space, this IP might sound familiar. The StarFive JH7110 (used in the VisionFive 2) uses the exact same Verisilicon DC8200 display controller.
I am actually working on enabling the display stack for the JH7110 in parallel. While the IP is the same, the integration is vastly different the JH7110 has a complex circular dependency between the HDMI PHY and the clock generator that requires a complete architectural rethink. But that is a story for a future blog post.
This sounds more promising – perhaps there is a route towards upstream support for the display controller, so let’s try out the patches and see how far we can get.
Initial Testing
The RFC patch series on the kernel mailing list is one way to get started, but it depends on a few other unmerged patches. Fortunately Michał uploaded the whole series on top of its dependencies in a branch on Github, so I fetched that branch and built the kernel from it.
After building the kernel, I initially couldn’t get the display controller to work – looking in dmesg suggests an issue:
verisilicon-dc 29400000.display:
    can't deassert reset lines
verisilicon-dc 29400000.display:
    probe with driver verisilicon-dc failed with
    error -110
starfive-inno-hdmi-controller 29590000.hdmi:controller:
    probe with driver starfive-inno-hdmi-controller
    failed with error -110
Originally I started to suspect there was something wrong with my board, but booting up with the StarFive kernel from the Debian distribution showed that the display controller was working, and I could see the login screen, so there must be some issue with the kernel I was booting instead.
The error -110 seems to be a timeout, so it could be that the clocks weren’t enabled for the resets that weren’t getting deasserted. Looking at the source in vs_dc.c, the code was trying to deassert three resets, core, axi, and ahb:
// From vs_dc_probe() in
// driver/gpu/drm/verisilicon/vs_dc.c:

dc->rsts[0].id = "core";
dc->rsts[1].id = "axi";
dc->rsts[2].id = "ahb";

// ...

ret = reset_control_bulk_deassert(
        VSDC_RESET_COUNT, dc->rsts);
if (ret) {
    dev_err(dev, "can't deassert reset lines\n");
    return ret;
}
So the question is – are all of the resets failing to be deasserted, or just one or two? To find out, I modified the the vs_dc_probe() function to deassert each reset individually, and which showed that they all timed out.
So it seems that the clocks are not enabled for any of them. I’m still a little fuzzy as to why they were not enabled, but some investigation showed that the devicetree has some reference to them in jh7110.dtsi:
/* Line 1217 onwards, inside vout_subsystem: */
clocks = <&syscrg JH7110_SYSCLK_NOC_BUS_DISP_AXI>;
resets = <&syscrg JH7110_SYSRST_NOC_BUS_DISP_AXI>;

dc8200: display@29400000 {
    compatible = "verisilicon,dc";
    reg = <0x0 0x29400000 0x0 0x2800>;
    interrupts = <95>;

    clocks = <&voutcrg JH7110_VOUTCLK_DC8200_CORE>,
             <&voutcrg JH7110_VOUTCLK_DC8200_AXI>,
             <&voutcrg JH7110_VOUTCLK_DC8200_AHB>,
             <&voutcrg JH7110_VOUTCLK_DC8200_PIX0>,
             <&voutcrg JH7110_VOUTCLK_DC8200_PIX1>;
        clock-names = "core", "axi", "ahb", "pix0", "pix1";

        resets = <&voutcrg JH7110_VOUTRST_DC8200_CORE>,
                 <&voutcrg JH7110_VOUTRST_DC8200_AXI>,
                 <&voutcrg JH7110_VOUTRST_DC8200_AHB>;
        reset-names = "core", "axi", "ahb";
};

hdmi_mfd: hdmi@29590000 {
    /* Some items omitted */
    hdmi_controller: controller {
        compatible = "starfive,jh7110-inno-hdmi-controller";
        interrupts = <99>;

        clocks = <&voutcrg JH7110_VOUTCLK_HDMI_TX_SYS>,
                 <&voutcrg JH7110_VOUTCLK_HDMI_TX_MCLK>,
                 <&voutcrg JH7110_VOUTCLK_HDMI_TX_BCLK>,
                 <&hdmi_phy>;
        clock-names = "sys", "mclk", "bclk", "pclk";

        resets = <&voutcrg JH7110_VOUTRST_HDMI_TX_HDMI>;
        reset-names = "hdmi_tx";

        phys = <&hdmi_phy>;
        phy-names = "hdmi-phy";
};

voutcrg: clock-controller@295c0000 {
    compatible = "starfive,jh7110-voutcrg";
    reg = <0x0 0x295c0000 0x0 0x10000>;

    clocks = <&syscrg JH7110_SYSCLK_VOUT_SRC>,
             <&syscrg JH7110_SYSCLK_VOUT_TOP_AHB>,
             <&syscrg JH7110_SYSCLK_VOUT_TOP_AXI>,
             <&syscrg JH7110_SYSCLK_VOUT_TOP_HDMITX0_MCLK>,
             <&syscrg JH7110_SYSCLK_I2STX0_BCLK>,
             <&hdmi_phy>;
    clock-names = "vout_src", "vout_top_ahb",
                "vout_top_axi", "vout_top_hdmitx0_mclk",
                "i2stx0_bclk", "hdmitx0_pixelclk";

    resets = <&syscrg JH7110_SYSRST_VOUT_TOP_SRC>;
    #clock-cells = <1>;
    #reset-cells = <1>;
};
In the above excerpt, I’ve not been able to understand the relationship between the clocks and resets in voutcrg and dc8200 or whether anything ought to change. As a “brute-force” workaround, let’s just try enabling them in clk-starfive-jh7110-vout.c by adding them at the end of jh7110_voutcrg_probe(), with the aim of ensuring that if the probe completes successfully, the clocks will be enabled:
// In jh7110_voutcrg_probe():

ret = clk_bulk_prepare_enable(
          top->top_clks_num,
          top->top_clks);

if (ret)
    goto err_exit;
After this change, we then get in dmesg:
verisilicon-dc 29400000.display:
    DC8200 rev 5720 customer 30e
starfive-inno-hdmi-controller 29590000.hdmi:controller:
    Using MFD regmap for registers
i2c i2c-7: of_i2c:
    modalias failure on /soc/display-subsystem@29400000/hdmi@29590000/controller/ports
i2c i2c-7:
    Failed to create I2C device for /soc/display-subsystem@29400000/hdmi@29590000/controller/ports
starfive-inno-hdmi-controller 29590000.hdmi:controller:
    [drm:inno_hdmi_probe] registered Inno HDMI I2C bus driver
verisilicon-dc 29400000.display:
    DC8200 rev 5720 customer 30e
verisilicon-dc 29400000.display:
    Skipping output 1
[drm] Initialized verisilicon 1.0.0 for 29400000.display on minor 0
This looks much more promising! Next, let’s see what modetest can tell us:
root@visionfive2:/home/gmarkall# modetest -p
trying to open device '/dev/dri/card0'... done
opened device `Verisilicon DC-series display
               controller driver`
    on driver `verisilicon` (version 1.0.0 at 0)
CRTCs:
id	fb	pos	size
35	0	(0,0)	(0x0)
  #0  nan 0 0 0 0 0 0 0 0 0 flags: ; type:
  props:
	24 VRR_ENABLED:
		flags: range
		values: 0 1
		value: 0
41	0	(0,0)	(0x0)
  #0  nan 0 0 0 0 0 0 0 0 0 flags: ; type:
  props:
	24 VRR_ENABLED:
		flags: range
		values: 0 1
		value: 0

Planes:
id crtc fb CRTC x,y x,y  gamma size possible crtcs
33	0	0	0,0		0,0	0       	0x00000001
  formats: XR12 XB12 RX12 ...
which looks good. Also:
root@visionfive2:/home/gmarkall# modetest -c
trying to open device '/dev/dri/card0'... done
opened device `Verisilicon DC-series display controller driver` on driver `verisilicon` (version 1.0.0 at 0)
Connectors:
id	encoder	status		name		size (mm)	modes	encoders
37	0	connected	HDMI-A-1       	600x340		33	36
  modes:
	index name refresh (Hz) hdisp hss hse htot vdisp vss vse vtot
  #0 3840x2160 30.00 3840 4016 4104 4400 2160 2168 2178 2250 297000 flags: phsync, pvsync; type: driver
  #1 3840x2160 29.97 3840 4016 4104 4400 2160 2168 2178 2250 296703 flags: phsync, pvsync; type: driver
  #2 3840x2160 25.00 3840 4896 4984 5280 2160 2168 2178 2250 297000 flags: phsync, pvsync; type: driver
  #3 3840x2160 24.00 3840 5116 5204 5500 2160 2168 2178 2250 297000 flags: phsync, pvsync; type: driver
  #4 3840x2160 23.98 3840 5116 5204 5500 2160 2168 2178 2250 296703 flags: phsync, pvsync; type: driver
  #5 2560x1440 59.95 2560 2608 2640 2720 1440 1443 1448 1481 241500 flags: phsync, nvsync; type: driver
  #6 2048x1280 59.99 2048 2192 2416 2784 1280 1281 1284 1325 221277 flags: nhsync, pvsync; type:
  #7 1920x1080 60.00 1920 2008 2052 2200 1080 1084 1089 1125 148500 flags: nhsync, nvsync; type: driver
  #8 1920x1080 60.00 1920 2008 2052 2200 1080 1084 1089 1125 148500 flags: phsync, pvsync; type: driver
  #9 1920x1080 59.94 1920 2008 2052 2200 1080 1084 1089 1125 148352 flags: phsync, pvsync; type: driver
  #10 1920x1080 50.00 1920 2448 2492 2640 1080 1084 1089 1125 148500 flags: phsync, pvsync; type: driver
  #11 1920x1080 25.00 1920 2448 2492 2640 1080 1084 1089 1125 74250 flags: phsync, pvsync; type: driver
  #12 1920x1080 24.00 1920 2558 2602 2750 1080 1084 1089 1125 74250 flags: phsync, pvsync; type: driver
  #13 1920x1080 23.98 1920 2558 2602 2750 1080 1084 1089 1125 74176 flags: phsync, pvsync; type: driver
  #14 1600x1200 60.00 1600 1664 1856 2160 1200 1201 1204 1250 162000 flags: phsync, pvsync; type: driver
  #15 1600x900 60.00 1600 1624 1704 1800 900 901 904 1000 108000 flags: phsync, pvsync; type: driver
  #16 1280x1024 75.02 1280 1296 1440 1688 1024 1025 1028 1066 135000 flags: phsync, pvsync; type: driver
  #17 1280x1024 60.02 1280 1328 1440 1688 1024 1025 1028 1066 108000 flags: phsync, pvsync; type: driver
  #18 1152x864 75.00 1152 1216 1344 1600 864 865 868 900 108000 flags: phsync, pvsync; type: driver
  #19 1280x720 60.00 1280 1390 1430 1650 720 725 730 750 74250 flags: phsync, pvsync; type: driver
  #20 1280x720 59.94 1280 1390 1430 1650 720 725 730 750 74176 flags: phsync, pvsync; type: driver
  #21 1280x720 50.00 1280 1720 1760 1980 720 725 730 750 74250 flags: phsync, pvsync; type: driver
  #22 1024x768 75.03 1024 1040 1136 1312 768 769 772 800 78750 flags: phsync, pvsync; type: driver
  #23 1024x768 60.00 1024 1048 1184 1344 768 771 777 806 65000 flags: nhsync, nvsync; type: driver
  #24 800x600 75.00 800 816 896 1056 600 601 604 625 49500 flags: phsync, pvsync; type: driver
  #25 800x600 60.32 800 840 968 1056 600 601 605 628 40000 flags: phsync, pvsync; type: driver
  #26 720x576 50.00 720 732 796 864 576 581 586 625 27000 flags: nhsync, nvsync; type: driver
  #27 720x480 60.00 720 736 798 858 480 489 495 525 27027 flags: nhsync, nvsync; type: driver
  #28 720x480 59.94 720 736 798 858 480 489 495 525 27000 flags: nhsync, nvsync; type: driver
  #29 640x480 75.00 640 656 720 840 480 481 484 500 31500 flags: nhsync, nvsync; type: driver
  #30 640x480 60.00 640 656 752 800 480 490 492 525 25200 flags: nhsync, nvsync; type: driver
  #31 640x480 59.94 640 656 752 800 480 490 492 525 25175 flags: nhsync, nvsync; type: driver
  #32 720x400 70.08 720 738 846 900 400 412 414 449 28320 flags: nhsync, pvsync; type: driver
EDID is working:
root@visionfive2:/home/gmarkall# cat \
    /sys/class/drm/card0-HDMI-A-1/edid | edid-decode

... Much output omitted ...

    Display Product Name: 'DELL S2722QC'

...
Let’s try displaying something:
root@visionfive2:/home/gmarkall# modetest -s \
  37@35:1920x1080 -P 33@35:1920x1080
trying to open device '/dev/dri/card0'... done
opened device
    `Verisilicon DC-series display controller driver`
  on driver `verisilicon` (version 1.0.0 at 0)
setting mode 1920x1080-60.00Hz
  on connectors 37, crtc 35
testing 1920x1080@XR24 overlay plane 33
We get an image that almost looks perfect:
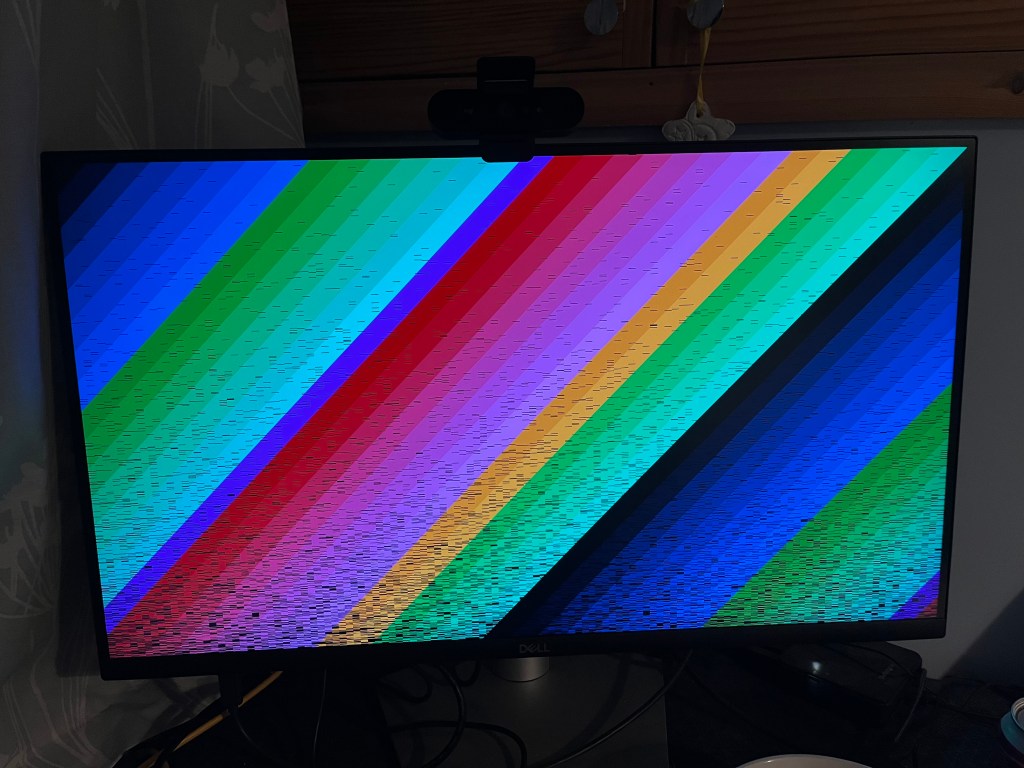
The only apparent issue is the black lines, about which we can note a couple of things:
- The “earliest” pixels in the image are nearly all correct
- Using the machine (running terminal commands,
htop, listing dirs, etc.) causes the black lines to fill in, until eventually the image is perfect:
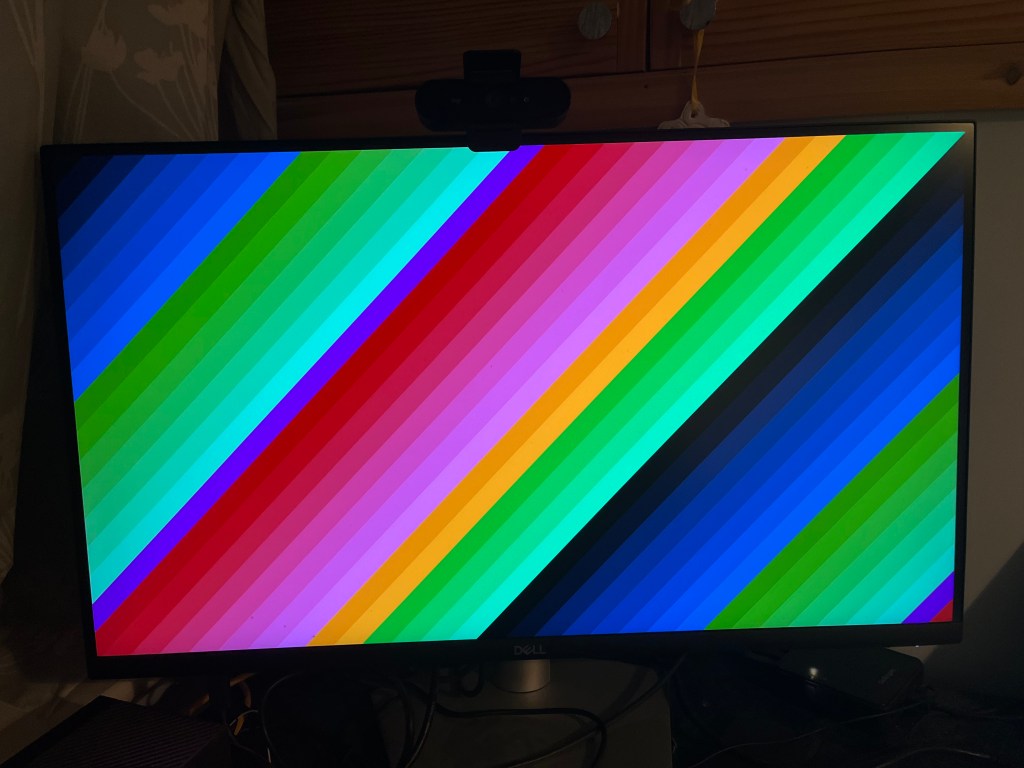
Both these items suggest that there is some cache coherence issue – pixels are written to the buffer but are cached and not flushed to RAM where the display controller can see them until all the cache lines are evicted. This requires some further investigation.
Next steps
After some email discussion, Michał confirmed that there is a caching issue. It seems that this issue is a little separate from enabling the display controller itself. I’ve been spending some time investigating this avenue (and made a little progress), but will need to save the details for a future post.
Acknowledgment
Many thanks to Michał Wilczyński for the various ways in which he has shared his efforts and extensive expertise:
- Developing and posting the patch series enabling the JH7110 display controller,
- Writing up the blog post on the TH-1520 GPU that initially piqued my interest,
- For kindly taking the time to correspond with me and patiently give me some pointers in the right directions when I was getting started with testing out the patches.
Thank you, Michał!
